Note
Access to this page requires authorization. You can try signing in or changing directories.
Access to this page requires authorization. You can try changing directories.
Estimated time: 10 minutes
Connect your incident platform and create a response plan. When incidents arrive, your agent automatically investigates and generates detailed execution plans.
What you accomplish
By the end of this step, your agent:
- Receives incidents from Azure Monitor, PagerDuty, or ServiceNow
- Automatically investigates matching incidents
- Generates AI execution plans from your instructions
- Collects evidence and provides recommendations
Prerequisites
| Requirement | Details |
|---|---|
| Agent created | Complete Step 1: Create your agent first. |
| Incident platform | Azure Monitor (default), PagerDuty, or ServiceNow. |
Tip
While not required, completing Step 2: Add knowledge and Step 3: Connect source code significantly enhances incident response. Your agent references your runbooks and correlates problems to specific code changes, turning generic investigations into team-specific root cause analysis.
Connect your incident platform
Choose and configure the incident platform your team uses.
Azure Monitor (default)
Azure Monitor connects automatically when you create your agent. No additional configuration is needed.
PagerDuty or ServiceNow
To connect PagerDuty or ServiceNow as your incident platform:
- Select Incidents in the left sidebar.
- Select Connect an incident platform. If another platform is connected, use its ... menu to disconnect it first.
- Choose your platform card:
- PagerDuty: Enter your REST API access key.
- ServiceNow: Enter your instance URL and credentials.
- Complete the remaining wizard steps and select Save.
Your agent now receives incidents from your platform.
Create a response plan
Create response plans from the Agent Canvas. You can see which triggers route to which subagents.
- Select Build + setup in the left sidebar.
- Expand Workflows and select Agent Canvas.
- Find the subagent you want to handle incidents and select the + button on its left side.
- Select Add incident response plan.
- Configure the trigger: set a name, select severity levels (for example, P1 and P2), choose the impacted service, and optionally add a title keyword filter.
- Choose the autonomy level (Review is recommended to start).
- Preview matching incidents, and then select Create.
Your trigger appears as a node connected to the subagent on the canvas.
Important
If you enabled a quickstart response plan during setup, it runs alongside your custom response plans and can cause incidents to be routed to the wrong custom agent or processed twice. To avoid conflicts, go to Incidents > Triggers & response plans, select the quickstart plan, and select Delete.
For the full step-by-step guide with screenshots, see the Set up an incident trigger tutorial.

What happens when an incident arrives
When an incident matches your plan, the agent handles it automatically.
- Retrieves incident details from your platform.
- Searches memory for similar past incidents and relevant documentation.
- Executes the plan by running commands and collecting evidence.
- Summarizes findings with timestamps and recommendations.
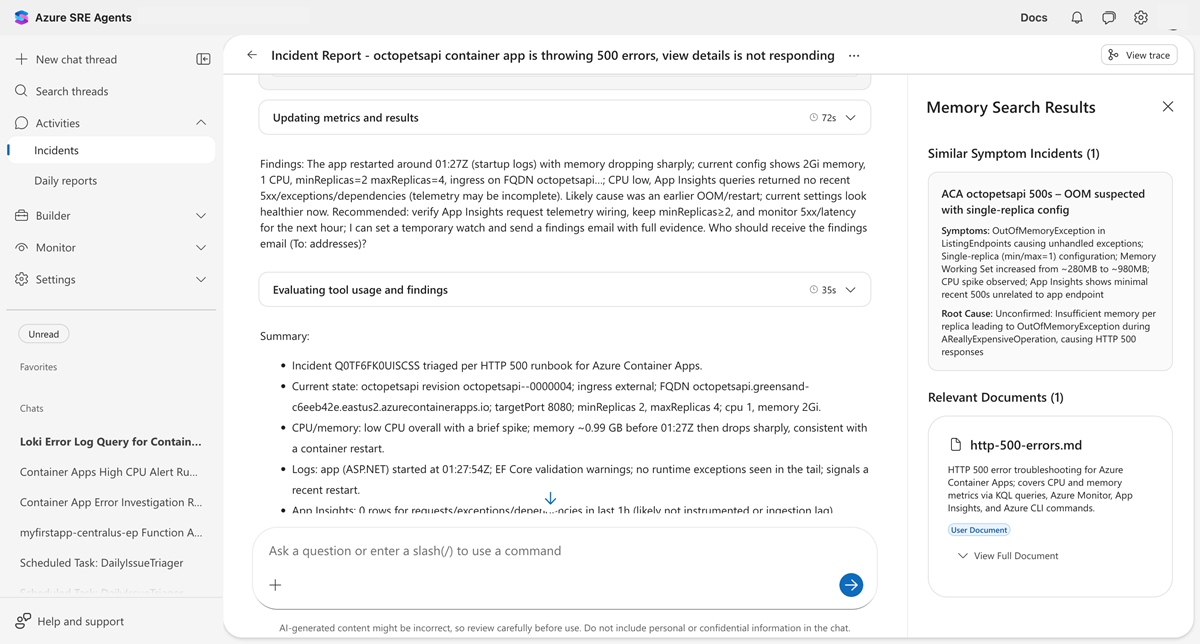
Example findings
The following example shows findings from a container app incident:
Summary:
- Container restarted around 01:27Z with memory dropping sharply.
- Current config: 2 Gi memory, 1 CPU, minReplicas=2, maxReplicas=4.
Likely cause: Transient container restart (OOM or deployment).
Recommended actions:
- Increase minReplicas to 3-4 to reduce restart impact.
- Review container health probes.
Your agent provides actionable recommendations based on evidence, not generic advice.