Note
Access to this page requires authorization. You can try signing in or changing directories.
Access to this page requires authorization. You can try changing directories.
✔️ Applies to: Classic NFS file shares created with the Microsoft.Storage resource provider
✔️ Applies to: File shares created with the Microsoft.FileShares resource provider
You can mount Azure file shares in Linux distributions by using either the Server Message Block (SMB) protocol or the Network File System (NFS) protocol. This article focuses on mounting with NFS. It covers network security prerequisites, installing the AzNFS mount helper, mount instructions for both the Microsoft.Storage and Microsoft.FileShares resource providers, automatic mounting by using /etc/fstab, recommended NFS mount options, and how to verify encryption in transit. For details on mounting SMB file shares, see Use Azure Files with Linux. For details on the available protocols, see Azure file share protocols.
Prerequisite: Configure network security
You can access NFSv4.1 file shares (both classic file shares created with the Microsoft.Storage resource provider and file shares created with Microsoft.FileShares resource provider) only from trusted networks. Secure the data by using a virtual network and other network security settings. You can't use Microsoft Entra security and access control lists (ACLs) to authorize NFSv4.1 requests. To learn more about how to set up NFSv4.1 file shares, see how to create a file share and how to create a classic file share.
Install the AzNFS mount helper
To mount a file share with encryption in transit, install the AzNFS mount helper on your client. The mount script from the Azure portal installs it for you. For how AzNFS encrypts NFS traffic, see How encryption in transit works.
AzNFS supports the following Linux distributions:
- Ubuntu (20.04 LTS, 22.04 LTS, 24.04 LTS)
- Debian (12, 13)
- Red Hat Enterprise Linux (8, 9, 10)
- Rocky Linux (8, 9)
- SUSE (SLES 15, SLES 16)
- Oracle Linux (8, 9, 10)
- AlmaLinux (8, 9, 10)
- Azure Linux (3.0)
To check if the AzNFS mount helper package is installed on your client, run the following command:
systemctl is-active --quiet aznfswatchdogv4 && echo -e "\nAZNFS mounthelper is installed! \n"
If the package is installed, you see the message AZNFS mounthelper is installed!. If it isn't installed, install the AzNFS mount helper package by using the appropriate command for your Linux distribution.
curl -sSL -O https://packages.microsoft.com/config/$(source /etc/os-release && echo "$ID/$VERSION_ID")/packages-microsoft-prod.deb
sudo dpkg -i packages-microsoft-prod.deb
rm packages-microsoft-prod.deb
sudo apt-get update
sudo apt-get install -y aznfs
If your setup requires a noninteractive install, set the following environment variables on the sudo command that installs AzNFS. By default, sudo doesn't pass variables that you export in your shell, so an export before the install has no effect.
For all distributions, add AZNFS_NONINTERACTIVE_INSTALL=1. For example:
sudo AZNFS_NONINTERACTIVE_INSTALL=1 yum install -y aznfs
For Debian and Ubuntu, you can also add DEBIAN_FRONTEND=noninteractive:
sudo AZNFS_NONINTERACTIVE_INSTALL=1 DEBIAN_FRONTEND=noninteractive apt-get install -y aznfs
Note
A noninteractive install sets AUTO_UPDATE_AZNFS=true by default.
Mount an NFS Azure file share
You can mount the share by using the AzNFS mount helper (an Azure NFS mount helper package) in the Azure portal, or you can use the native NFS mount commands at the command line. You can also create a record in the /etc/fstab file to automatically mount the share every time the Linux server or VM boots.
Use the nconnect Linux mount option to improve performance for NFS Azure file shares at scale. For more information, see Improve NFS Azure file share performance.
The mount instructions differ depending on whether you created the NFS file share by using the Microsoft.Storage resource provider (classic file share) or the Microsoft.FileShares resource provider.
Classic NFS file share (Microsoft.Storage)
Follow these steps to mount a classic NFS file share.
- After you create the file share, select the share and then select Connect from Linux.
- Enter the mount path you want to use, and then copy the script and run it on your client. The Azure portal offers a step-by-step, ready-to-use installation script tailored to your selected Linux distribution for installing the AzNFS mount helper package and to securely mount the share by using encryption in transit. The script includes only the required mount options, but you can add other recommended mount options.
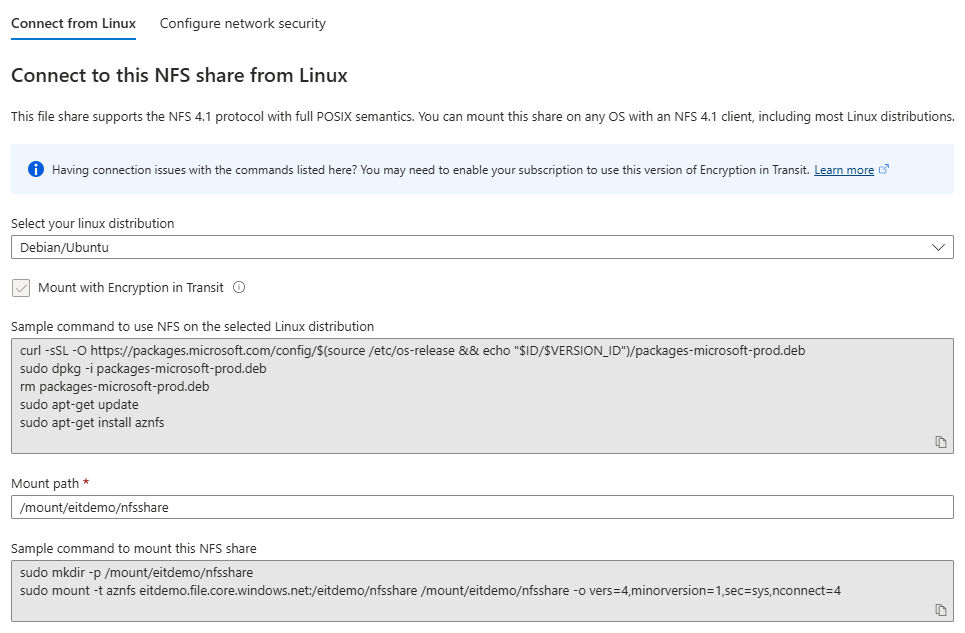
Mount a classic NFS share by using the AzNFS mount helper
After you install the AzNFS mount helper, you can mount the share with or without encryption in transit. Replace <YourStorageAccountName> and <FileShareName> with your information.
To mount the share with encryption in transit, run the following commands:
sudo mkdir -p /mount/<YourStorageAccountName>/<FileShareName>
sudo mount -t aznfs \
    <YourStorageAccountName>.file.core.windows.net:/<YourStorageAccountName>/<FileShareName> \
    /mount/<YourStorageAccountName>/<FileShareName> \
    -o vers=4,minorversion=1,sec=sys,nconnect=4
Note
To mount an NFS share with a custom CA certificate, add cafile=<absolute-path> as an extra parameter to the mount command.
To mount the share without encryption in transit, add the notls option:
sudo mkdir -p /mount/<YourStorageAccountName>/<FileShareName>
sudo mount -t aznfs \
    <YourStorageAccountName>.file.core.windows.net:/<YourStorageAccountName>/<FileShareName> \
    /mount/<YourStorageAccountName>/<FileShareName> \
    -o vers=4,minorversion=1,sec=sys,nconnect=4,notls
Note
To mount file shares in Azure national clouds or with a custom DNS configuration, set the environment variable AZURE_ENDPOINT_OVERRIDE on the sudo command that runs the mount. By default, sudo doesn't pass variables that you export in your shell. For example, for Azure China Cloud: sudo AZURE_ENDPOINT_OVERRIDE="chinacloudapi.cn" mount -t aznfs ...
Note
All traffic from a virtual machine to the same server endpoint uses a single connection. The AzNFS mount helper ensures that you can't mix TLS and non-TLS configurations when mounting shares to that server. This rule applies to shares from the same storage account and different storage accounts that resolve to the same IP address.
Mount a classic NFS share by using the NFS client mount at the command line
You can also mount the Azure file share by using NFS client mount at the command line. Select the tab for your Linux distribution to see the commands you need to run. Replace <YourStorageAccountName> and <FileShareName> with your information.
sudo apt-get -y update
sudo apt-get install nfs-common

sudo mkdir -p /mount/<YourStorageAccountName>/<FileShareName>
sudo mount -t nfs <YourStorageAccountName>.file.core.windows.net:/<YourStorageAccountName>/<FileShareName> /mount/<YourStorageAccountName>/<FileShareName> -o vers=4,minorversion=1,sec=sys,nconnect=4
NFS file share (Microsoft.FileShares)
Follow these steps to mount a file share created with the Microsoft.FileShares resource provider.
After you create the file share, select the share and then select Connect from Linux.
Enter the mount path you want to use, and then copy the script and run it on your client. The Azure portal offers a step-by-step, ready-to-use installation script tailored to your selected Linux distribution for installing the AzNFS mount helper package and to securely mount the share by using encryption in transit. If the file share requires encryption in transit, the mount script uses the AzNFS mount helper. If the Require encryption in transit feature is off, clear the Mount with encryption in transit check box to use different mount commands to mount the file share. The script includes only the required mount options, but you can add other recommended mount options.
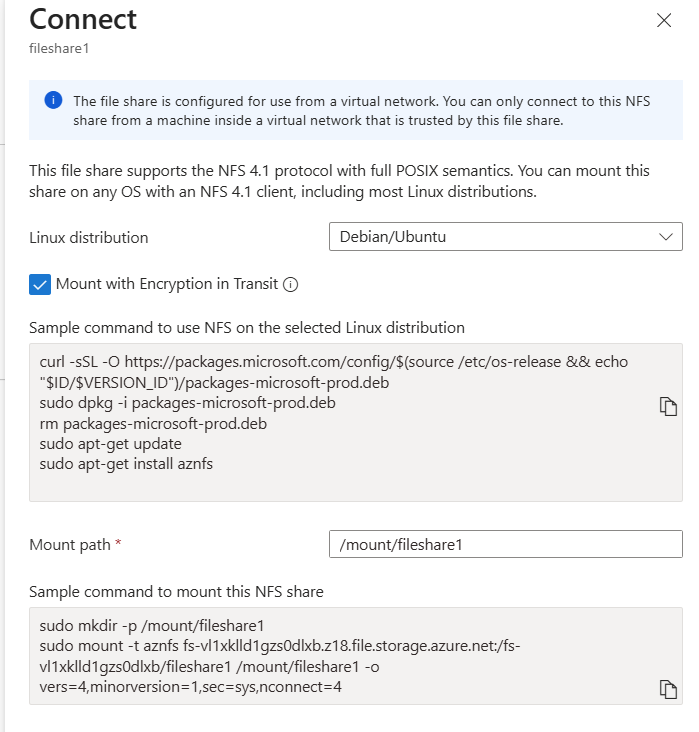
Mount an NFS share by using the NFS client mount at the command line
You can also mount the file share by using the NFS client mount at the command line. Select the tab for your Linux distribution to see the commands you need to run. Replace <your-subscription-id>, <your-resource-group>, and <your-file-share-name> with your information.
# Customize these placeholders:
# - <your-subscription-id>: Your Azure subscription ID.
# - <your-resource-group>: The resource group that contains the file share.
# - <your-file-share-name>: The name of your file share.

# You use $hostName later when you mount the file share.
hostName=$(az resource show \
  --ids "/subscriptions/<your-subscription-id>/resourceGroups/<your-resource-group>/providers/Microsoft.FileShares/fileShares/<your-file-share-name>" \
  --query "properties.hostName" \
  --output tsv)
echo $hostName

# You use $shortName later when you mount the file share.
prefix=$(echo "$hostName" | sed 's/\.file\.storage\.azure\.net.*//')
shortName=$(echo "$prefix" | sed 's/\.[^.]*$//')
echo $shortName
sudo apt-get -y update
sudo apt-get install nfs-common
sudo mkdir -p /mount/<your-file-share-name>
sudo mount -t nfs $hostName:/$shortName/<your-file-share-name> /mount/<your-file-share-name> -o vers=4,minorversion=1,sec=sys
Mount an NFS share by using the AzNFS mount helper
After you install the AzNFS mount helper, you can mount the share with encryption in transit. Set $hostName and $shortName by running the commands in Mount an NFS share by using the NFS client mount at the command line. Replace <your-file-share-name> with your information.
sudo mkdir -p /mount/<your-file-share-name>
sudo mount -t aznfs \
    $hostName:/$shortName/<your-file-share-name> \
    /mount/<your-file-share-name> \
    -o vers=4,minorversion=1,sec=sys,nconnect=4
To mount the share without encryption in transit, add the notls option to the -o list.
Mount by using /etc/fstab
To automatically mount the NFS file share every time the Linux server or VM boots, create a record in the /etc/fstab file for your Azure file share. The record differs depending on whether you're using the AzNFS mount helper or the native NFS mount commands.
If you use the AzNFS mount helper, install it first.
For a classic file share, replace <YourStorageAccountName> and <FileShareName> with your own values. For a Microsoft.FileShares file share, replace hostName and shortName with the correct values. For more information, enter the command man fstab from the Linux command line.
Create the mount point before you add the record. The mount fails if the directory doesn't exist.
# For Microsoft.Storage file share, use:
sudo mkdir -p /media/<YourStorageAccountName>/<FileShareName>

# For Microsoft.FileShares file share, use:
sudo mkdir -p /media/$shortName/<FileShareName>
Mount by using AzNFS mount helper with encryption in transit
If you're using the AzNFS mount helper and want to mount the share by using encryption in transit, the record in /etc/fstab should look like this:
# For Microsoft.Storage file share, use:
<YourStorageAccountName>.file.core.windows.net:/<YourStorageAccountName>/<FileShareName> /media/<YourStorageAccountName>/<FileShareName> aznfs defaults,sec=sys,vers=4,minorversion=1,nolock,proto=tcp,nofail,_netdev   0 2

# For Microsoft.FileShares file share, use:
$hostName:/$shortName/<FileShareName> /media/$shortName/<FileShareName> aznfs defaults,sec=sys,vers=4,minorversion=1,nolock,proto=tcp,nofail,_netdev   0 2
Mount by using AzNFS mount helper without encryption in transit
If you're using the AzNFS mount helper but don't want to use encryption in transit, the record in /etc/fstab should look like this:
# For Microsoft.Storage file share, use:
<YourStorageAccountName>.file.core.windows.net:/<YourStorageAccountName>/<FileShareName> /media/<YourStorageAccountName>/<FileShareName> aznfs defaults,sec=sys,vers=4,minorversion=1,nolock,proto=tcp,nofail,_netdev,notls   0 2

# For Microsoft.FileShares file share, use:
$hostName:/$shortName/<FileShareName> /media/$shortName/<FileShareName> aznfs defaults,sec=sys,vers=4,minorversion=1,nolock,proto=tcp,nofail,_netdev,notls   0 2
Mount by using native mount command
If you're using the native NFS mount without AzNFS, the record in /etc/fstab should look like this:
# For Microsoft.Storage file share, use:
<YourStorageAccountName>.file.core.windows.net:/<YourStorageAccountName>/<FileShareName> /media/<YourStorageAccountName>/<FileShareName> nfs vers=4,minorversion=1,_netdev,nofail,sec=sys 0 0

# For Microsoft.FileShares file share, use:
$hostName:/$shortName/<FileShareName> /media/$shortName/<FileShareName> nfs vers=4,minorversion=1,_netdev,nofail,sec=sys 0 0
NFS mount options for Azure file shares
Use the following mount options when mounting NFS Azure file shares.
| Mount option | Recommended value | Description |
|---|---|---|
vers |
4 | Required. Specifies which version of the NFS protocol to use. Azure Files only supports NFSv4.1. |
minorversion |
1 | Required. Specifies the minor version of the NFS protocol. Some Linux distros don't recognize dotted minor versions on the vers parameter. Instead of vers=4.1, use vers=4,minorversion=1. |
sec |
sys | Required. Specifies the type of security to use when authenticating an NFS connection. Setting sec=sys uses the local UNIX UIDs and GIDs that use AUTH_SYS (the standard UNIX/Linux authentication scheme) to authenticate NFS operations. |
rsize |
1048576 | Recommended. Sets the maximum number of bytes to transfer in a single NFS read operation. Specifying the maximum level of 1,048,576 bytes usually results in the best performance. |
wsize |
1048576 | Recommended. Sets the maximum number of bytes to transfer in a single NFS write operation. Specifying the maximum level of 1,048,576 bytes usually results in the best performance. |
noresvport |
n/a | Recommended for kernels before 5.18. Tells the NFS client to use a nonprivileged source port when communicating with an NFS server for the mount point. Using the noresvport mount option helps ensure that your NFS share has uninterrupted availability after a reconnection. Using this option is recommended for achieving high availability. |
actimeo |
30-60 | Recommended. Specifying actimeo sets all of acregmin, acregmax, acdirmin, and acdirmax to the same value. Using a value lower than 30 seconds can cause performance degradation because attribute caches for files and directories expire too quickly. Set actimeo between 30 and 60 seconds. |
nconnect |
4 | Recommended. nconnect increases performance by using multiple TCP connections between the client and your NFS share. Configure the mount options with the optimal setting of nconnect=4. The Azure Files implementation of nconnect has no gains beyond four channels. |
clean |
n/a | A non-TLS mount might fail for a few minutes after a TLS mount to the same server ends, because stale entries remain. To resolve this issue, remount the share by using the clean option, which immediately clears any stale entries. This option applies only to AzNFS mounts. |
Verify encryption in transit
To check that an AzNFS mount uses encryption in transit, run df -Th. The file share is mounted from 127.0.0.1, not from the storage account endpoint.
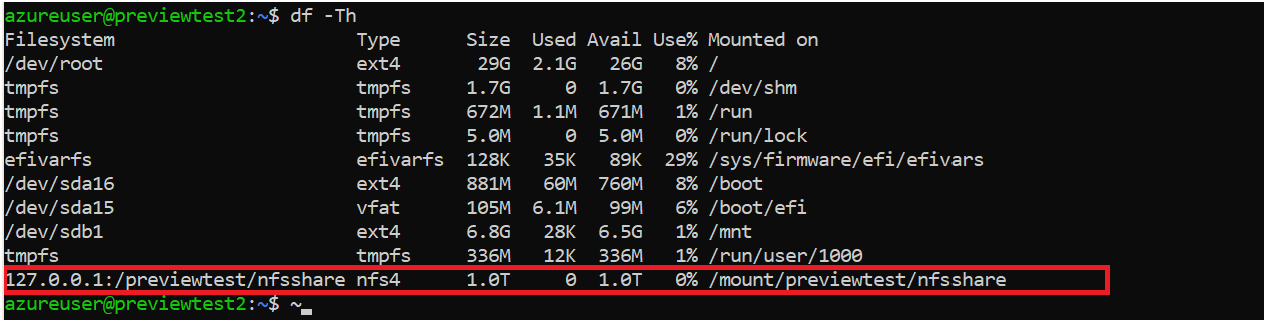
The stunnel process listens on 127.0.0.1 for NFS traffic from the NFS client. Stunnel forwards this traffic over TLS to Azure Files.
To check the TLS version and cipher that stunnel negotiated with Azure Files, search the stunnel logs:
sudo grep -h ciphersuite /etc/stunnel/microsoft/aznfs/nfsv4_fileShare/logs/*
Each TLS connection writes a line like the following example:
2026.10.25 00:41:44 LOG6[0]: TLSv1.3 ciphersuite: TLS_AES_256_GCM_SHA384 (256-bit encryption)
To check that the NFS traffic on the network is encrypted, capture packets on port 2049 by using tcpdump:
sudo tcpdump -i any port 2049 -w nfs_traffic.pcap
Open the capture in Wireshark. The NFS payload shows as TLS Application Data, not as readable text.
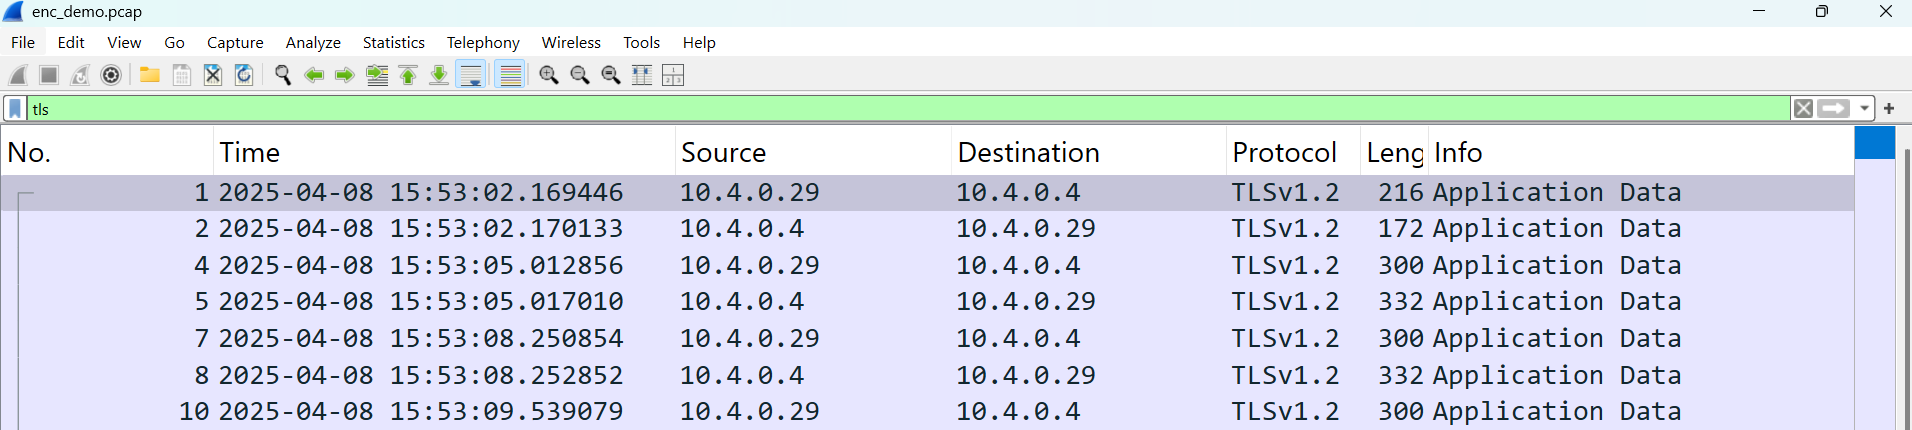
Troubleshoot AzNFS mounts
A non-TLS (notls) mount might fail if you recently mounted the same server with TLS. This failure can occur after a normal unmount, and after a TLS mount that ended before it completed. The aznfswatchdogv4 service cleans up the stale TLS entries after a timeout. A non-TLS mount before the cleanup completes fails with the error Mount to the same endpoint <IP address> exists that is using TLS.
To resolve this issue, remount the share by using the clean option, which immediately clears any stale entries:
sudo mount -t aznfs \
    <YourStorageAccountName>.file.core.windows.net:/<YourStorageAccountName>/<FileShareName> \
    /mount/<YourStorageAccountName>/<FileShareName> \
    -o vers=4,minorversion=1,sec=sys,nconnect=4,notls,clean
If the VM is joined to a custom domain, use the custom DNS FQDN or short name of the file share in /etc/fstab, as defined in your DNS. To check host name resolution, run nslookup <hostname> and getent hosts <hostname>. Set the environment variable AZURE_ENDPOINT_OVERRIDE on the sudo command that runs the mount, for example sudo AZURE_ENDPOINT_OVERRIDE="<your-dns-suffix>" mount -t aznfs ....
If mounting issues continue, check the log files for more troubleshooting details:
- Mount helper and watchdog logs:
/opt/microsoft/aznfs/data/aznfs.log - Stunnel logs:
/etc/stunnel/microsoft/aznfs/nfsv4_fileShare/logs
Validate connectivity
If your mount fails, it's possible that your private endpoint isn't set up correctly or isn't accessible. For details, see Verify connectivity.
NFS file share snapshots
You can take file share snapshots when using NFS Azure file shares. This capability allows you to roll back entire file systems or recover files that are accidentally deleted or corrupted. See Use share snapshots with Azure Files.
Next step
- If you experience any issues, see Troubleshoot NFS Azure file shares.