Azure MCP 服务器使用模型上下文协议(MCP)来标准化 AI 应用与外部工具和数据源之间的集成,使 AI 系统能够执行上下文感知的操作,了解您的 Azure 资源。
本文介绍如何完成以下任务:
- 安装并验证 Azure MCP Server 的身份。
- 在 Visual Studio 中使用 GitHub Copilot 代理模式连接到 Azure MCP 服务器。
- 运行提示命令以测试 Azure MCP 服务器操作并与 Azure 资源交互。
先决条件
- 具有活动订阅的 Azure 帐户。
- Visual Studio。
- 已安装 .NET 10 或 Node.js LTS。
安装 Azure MCP 服务器
Visual Studio 使用名为 mcp.json 的文件来检查 MCP 服务器配置,包括由其他开发环境设置的配置。 MCP 服务器配置按以下顺序从以下目录读取:
-
%USERPROFILE%\.mcp.json:充当特定用户的全局 MCP 服务器配置。 在此处添加 MCP 服务器,使其加载所有 Visual Studio 解决方案。 -
<SOLUTIONDIR>\.vs\mcp.json:特定于 Visual Studio,并且仅加载特定用户的指定 MCP 服务器(对于指定的解决方案)。 -
<SOLUTIONDIR>\.mcp.json:可在存储库的源代码管理中跟踪的解决方案级 MCP 配置。 -
<SOLUTIONDIR>\.vscode\mcp.json:范围限定于存储库/解决方案,通常不包括在版本控制中。 -
<SOLUTIONDIR>\.cursor\mcp.json:范围限定于存储库/解决方案,通常不包括在版本控制中。
注释
其中一些位置需要 .mcp.json (带前导点),而另一些位置需要 mcp.json。
Azure MCP 服务器以 NuGet 包或 NPM 包的形式提供。 以下选项演示了从 Visual Studio 连接到 Azure MCP Server 的两种最常见方法。
注释
或者,可以使用 Azure 扩展GitHub Copilot来安装 Azure MCP 服务器。
完成以下步骤,为特定目录安装 Azure MCP 服务器:
在解决方案的根目录创建名为
.mcp.json的新文件。 使用 Visual Studio 编辑此文件,以便自动应用其 JSON 架构。在
.mcp.json文件中,为首选包添加以下 JSON:NuGet:
{
  "servers": {
      "Azure MCP Server": {
          "command": "dnx",
          "args": [
              "Azure.Mcp",
              "--source",
              "https://api.nuget.org/v3/index.json",
              "--yes",
              "--",
              "azmcp",
              "server",
              "start"
          ],
          "type": "stdio"
      }
  }
}
NPM:
{
  "servers": {
    "Azure MCP Server": {
      "command": "npx",
      "args": [
        "-y",
        "@azure/mcp@latest",
        "server",
        "start"
      ]
    }
  }
}
保存所做更改。
打开 GitHub Copilot 并选择代理模式。
选择工具图标以查看可用工具。 搜索 Azure MCP 服务器 以筛选结果。

Visual Studio 2026 包含具有 Azure 和 AI 开发工作负载的 Azure MCP 服务器工具。 若要使其可用,
打开 Visual Studio 安装程序工具。
选择 “修改” 以查看可用的工作负荷。
在“ 工作负荷 ”选项卡上,选择 “Azure 和 AI 开发”。
在 “安装详细信息 ”面板中,验证是否已选择 GitHub Copilot ,其中包括以下组件:
- GitHub Copilot
- 适用于 Azure 的 GitHub Copilot
- Azure MCP 服务器
下载时选择“安装”以完成安装过程。

向 Azure 进行身份验证
Azure MCP 服务器使用 Azure 帐户和 Microsoft Entra ID 提供无缝身份验证体验。 若要使用 Azure MCP 服务器,请先使用本地开发工具(如Azure CLI、Azure开发人员 CLI、Visual Studio或Visual Studio Code)进行身份验证以Azure。 Azure MCP 服务器会自动发现这些工具中的凭据,并使用这些凭据向 Azure 服务进行身份验证。
例如,若要使用 Azure CLI 登录:
az login运行以下命令来验证身份验证状态,以查看当前登录的帐户和订阅:
az account show确保用户帐户具有要与之交互的 Azure 服务的适当角色分配。 你打算使用 Azure MCP 服务器访问的Azure资源必须已存在于Azure订阅中。 例如,常见的角色分配包括:
- Blob 存储数据贡献者 - 在存储帐户中读取和写入 Blob 数据。
- 存储帐户参与者 - 管理存储帐户配置。
- 参与者 – 跨订阅的常规资源管理。
- 读取者 - 对 Azure 资源的只读访问权限。
有关角色分配和本地开发身份验证的详细信息,请参阅 在本地开发期间向 Azure 服务验证 .NET 应用。
使用提示测试 Azure MCP 服务器
打开 GitHub Copilot 并选择代理模式。
输入促使代理使用 Azure MCP 服务器工具的提示,例如 列出我的 Azure 资源组。
若要向 AZURE MCP 服务器进行身份验证,Copilot会提示你使用浏览器登录Azure。
注释
如果已通过其他本地工具(例如Azure CLI)进行身份验证,Copilot不会提示你登录Azure。
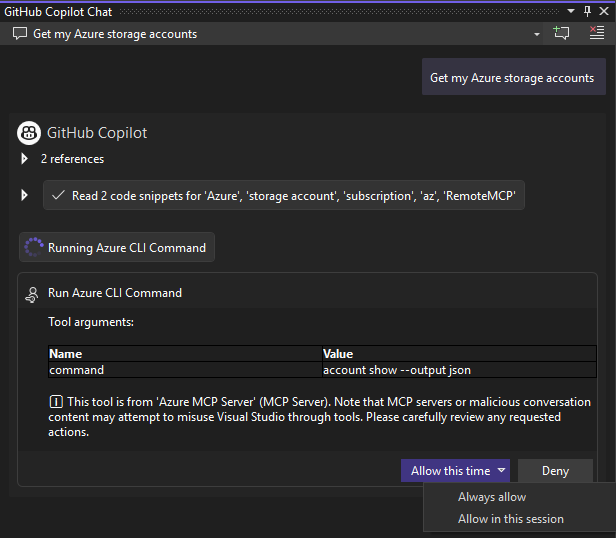
Copilot 请求许可以在 Azure MCP 服务器上执行您的指令所需的操作。 选择 “允许”这一次,或使用箭头选择更具体的行为:
- 始终允许将该操作设置为在任何 Visual Studio 解决方案中的任何 GitHub Copilot 代理模式会话里始终运行。
- 选择 在此会话中允许 后,系统始终会在当前 GitHub Copilot 代理模式会话中运行该操作。
上一提示的输出应类似于以下文本:
The following resource groups are available for your subscription:

1. **DefaultResourceGroup-EUS** (Location: `eastus`)
2. **rg-testing** (Location: `centralus`)
3. **rg-azd** (Location: `eastus2`)
4. **msdocs-sample** (Location: `southcentralus`)
5. **ai-testing** (Location: `eastus2`)

Let me know if you need further details or actions related to any of these resource groups!
使用其他相关提示探索和测试 Azure MCP 运营,例如:
List all of the storage accounts in my subscription
Get the available tables in my storage accounts